Cometary Activity
Tutorial
TUTORIAL TO BECOME A COMET WATCHER
First time observing a comet? Read this page to master your Unistellar telescope and join our team of Comet Watchers.
PRE-OBSERVATION
1 – Select Your Mission
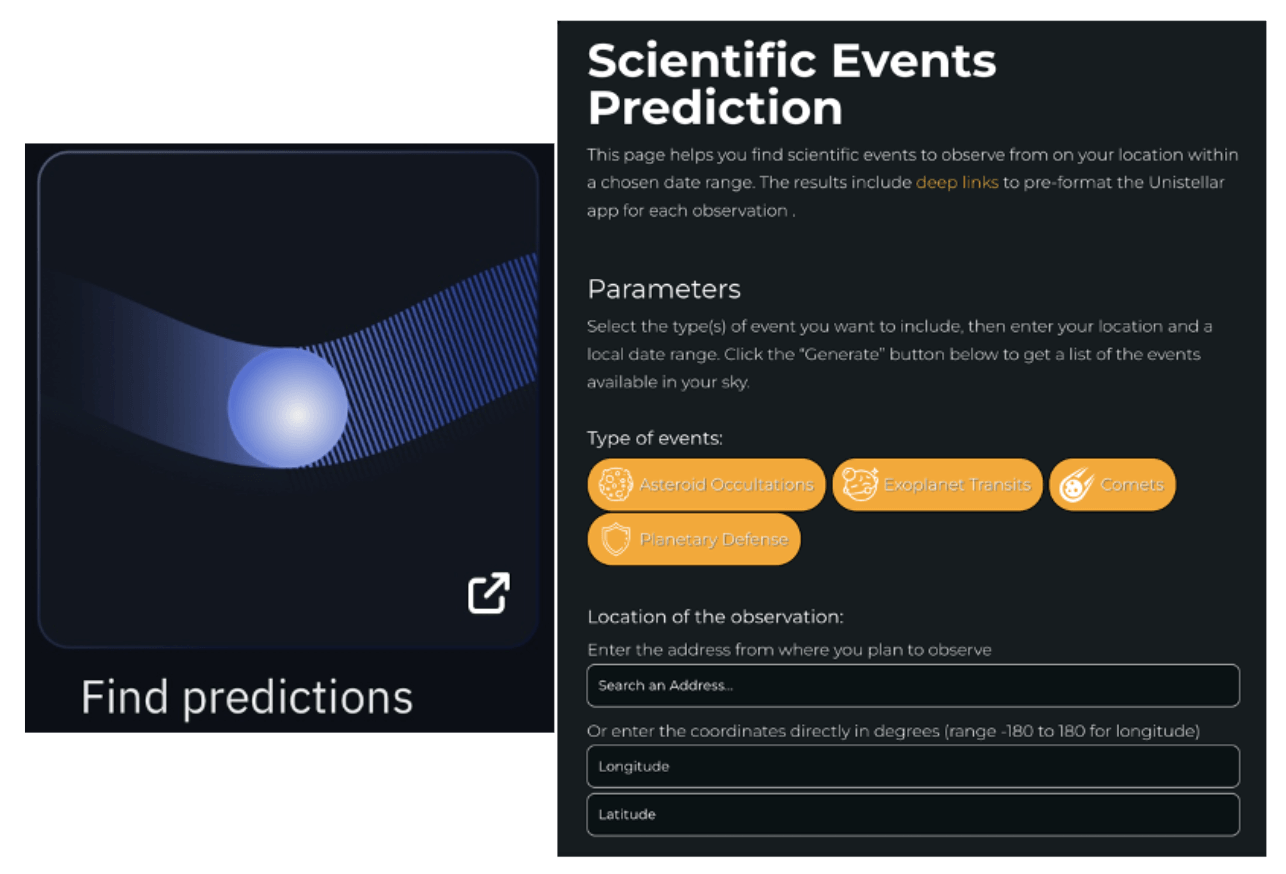
The passage of a comet is a unique event to record, and to observe one you need to be in a specific area on Earth. First, you need to select a mission visible to your location. This is easy using the Unistellar Scientific Events Prediction Page! This page will show you all of the comets visible to your observing site within a given date range. It is also accessible through the Unistellar app Home or Science menu by clicking on the “Find Predictions” icon.
Note that comets are fast-moving targets to observe. Their coordinates in the sky depend on the location and date of the observation. If the comet is in the Unistellar App Catalog, then you will have access to the coordinates from the app and you can skip to Step 4 unless you need suggestions on what to observe! The recording parameters (Duration, Exposure Time, and Gain) that you will need to do a science observation, as instructed later in this tutorial, are always given on the Cometary Activity Missions page.
However, if the comet is not in the Unistellar App Catalog, you must use the Scientific Event Prediction & Comet Ephemeris pages, as described below in Steps 2 & 3, to compute its coordinates and get a Deep Link. The Predictions page is useful in either case to show you what comets are visible to your location!
2 – Read The Prediction
To use the Predictions page to observe comets, first make sure that the “Comets” button is highlighted in yellow. In the “Location of the observation” box, input the address or coordinates of the location on Earth from which you will be observing. Lastly, in the “Starting Date” box select the date and time you would like to start searching for comets to observe — this is important because comets are moving targets.
You are now ready to search for missions by clicking the “Generate” button, which will display a table of events visible to your location.
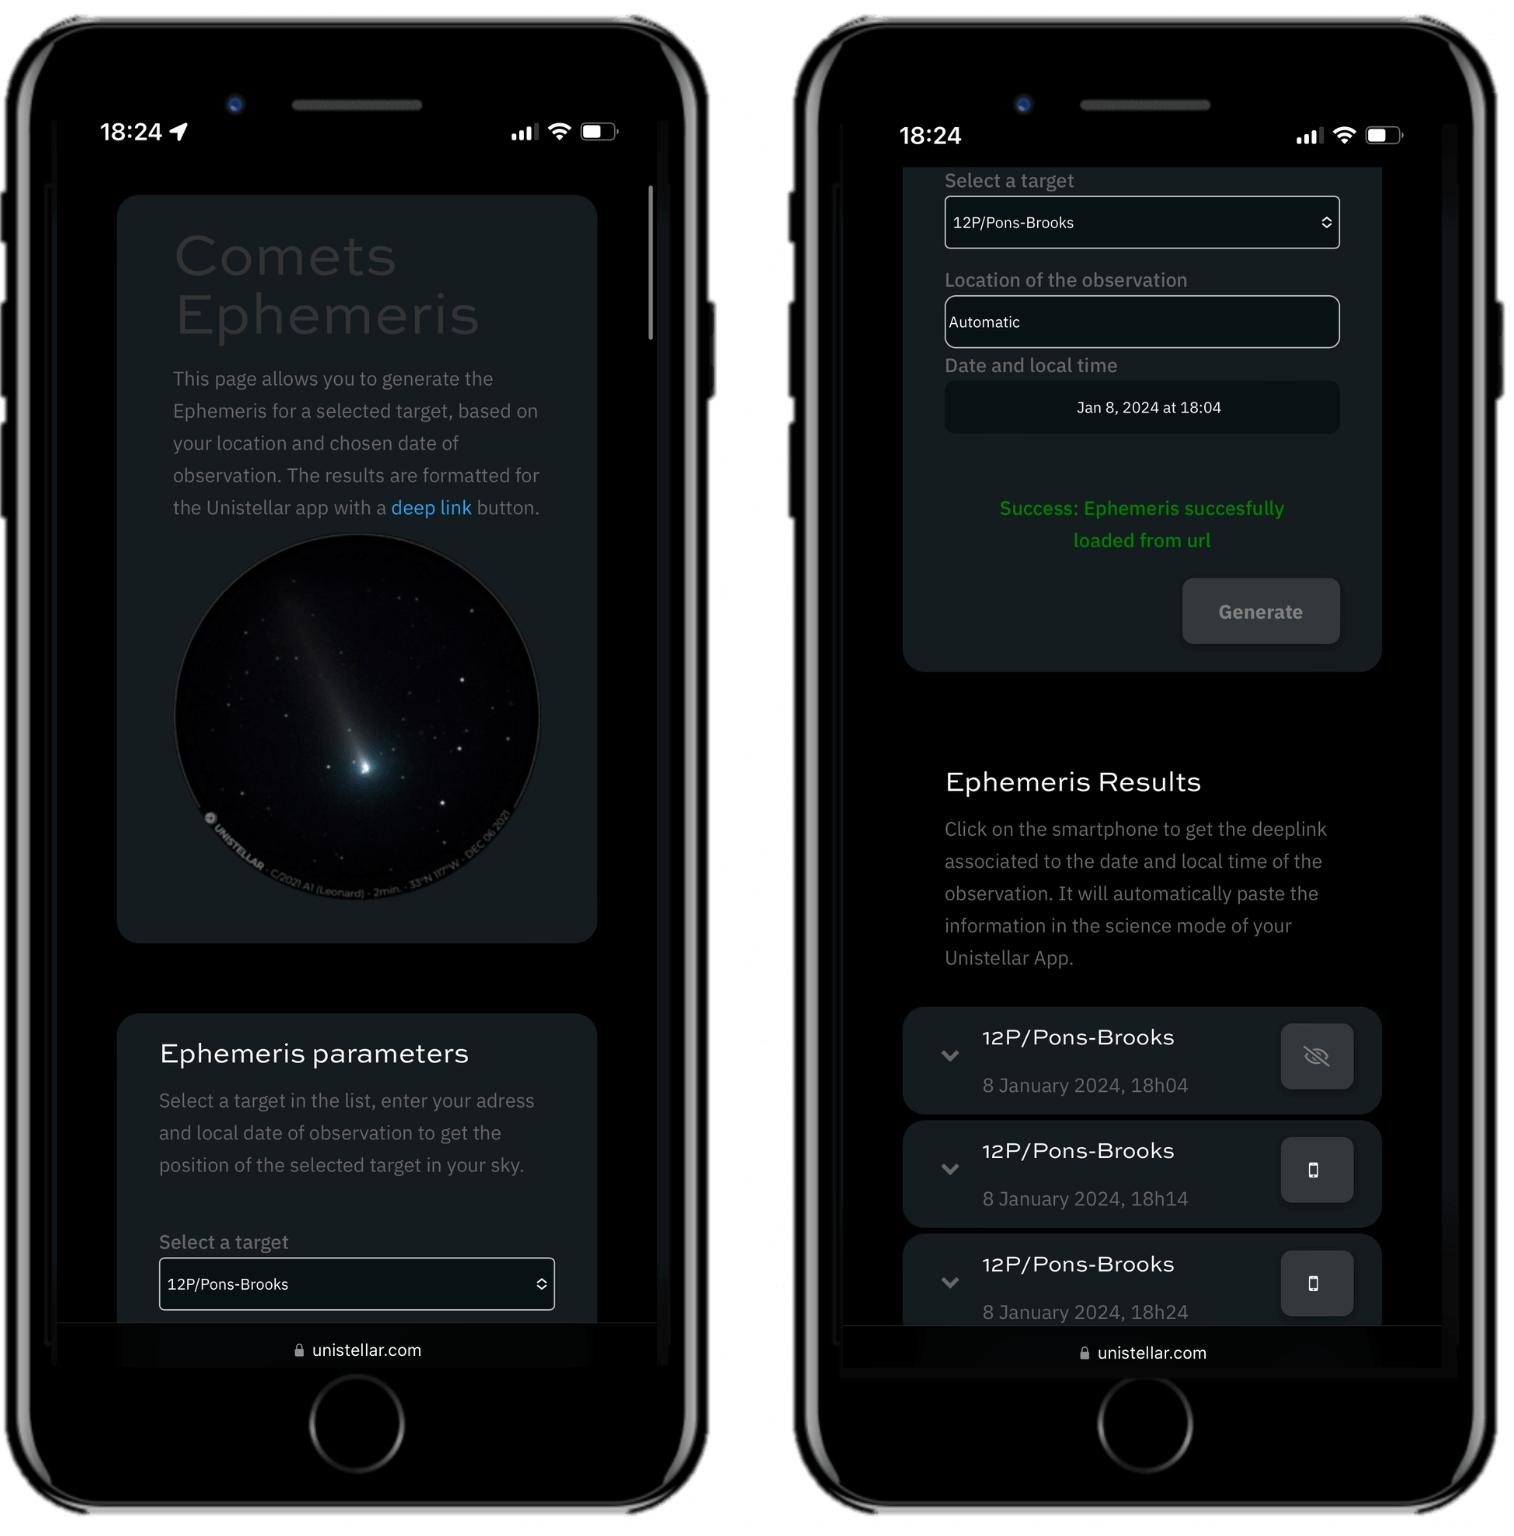
After you have clicked “Generate,” a table of all Comet targets visible during the provided date range will be displayed; however, you now need to tailor them to your specific observing location. Each row will include the target name and your input Starting Date, as well as a Link located in the last icon in the row. Click this Link to go to the Comet Ephemeris Page and generate coordinates tailored to your location and time.

3 – COMET Ephemeris (Optional)
Each line on the Comet Ephemeris page‘s list corresponds to the position of your target at a specific time between your Starting Date and 8 hours later, in increments of 20 minutes. If the target is visible from your location, you will be able to click on the smartphone icon, which contains a Deep Link that will open your Unistellar App and fill the Comets tab with the recording parameters. If your target is not visible, a crossed-out eye icon will appear instead. You can click on a row of the list to reveal the recording parameters and additional information.
OBSERVATION
4 – 10 Minutes Before Your Mission
We recommend observing the comet with the enhanced vision mode first to see the comet and its coma live for 10 to 20 minutes, and then to repeat the observation within the scientific mode to help scientists.
It is time to point to your target. You have two options depending on whether or not the comet is in the App Catalog.
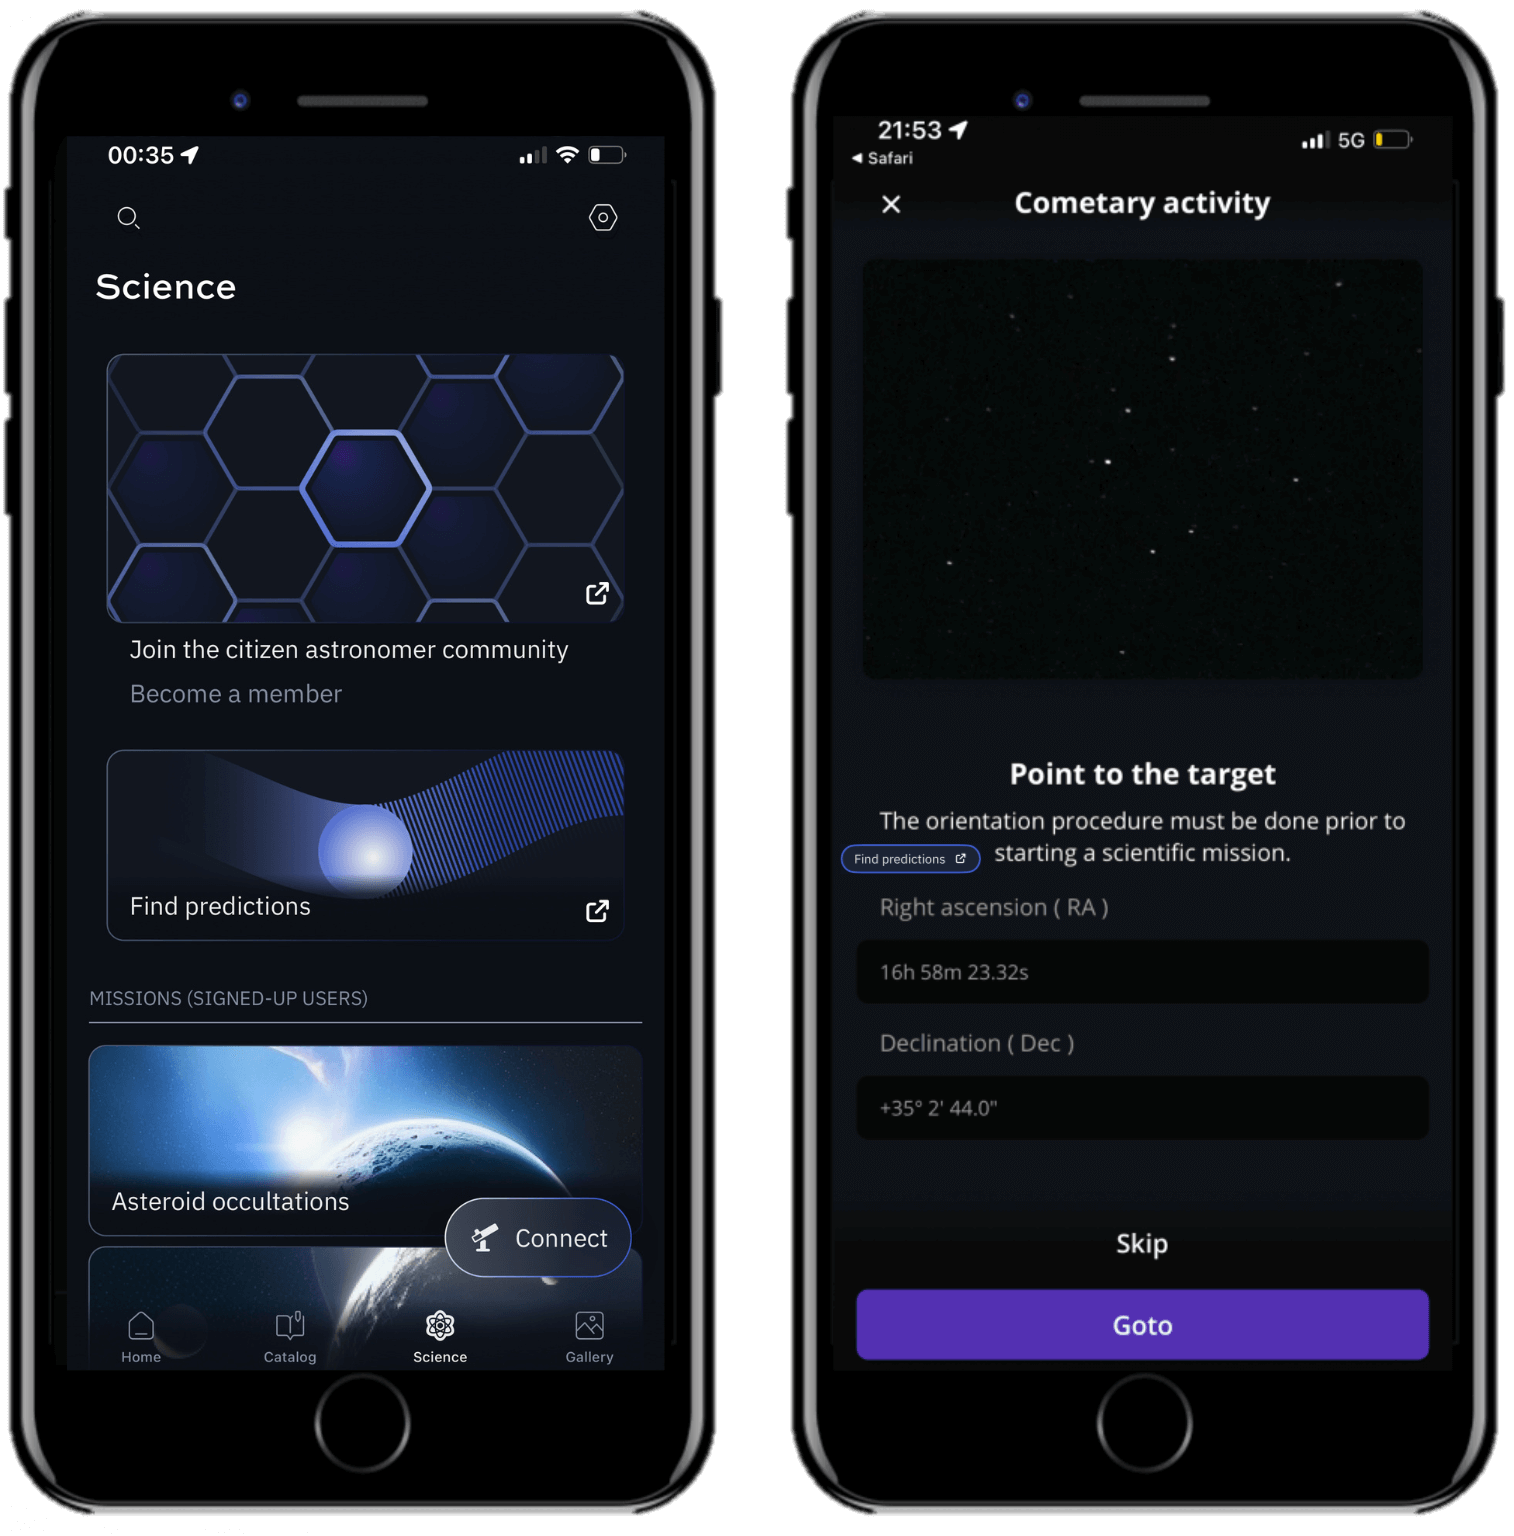
A. The comet is in the catalog: Open your Unistellar App, in the Catalog, enter the name of your comet, select it and click on Goto. Once the goto is Done, click on the Science menu and select the Cometary Activity tab. Skip the step that prompts you to Point to the Target. Enter the Record duration, Exposure time, and Gain – then click on Save.
B. The comet is NOT in the App Catalog: The quickest way to find your target is to use your smartphone to click on the Deep Link generated with our Comet Ephemeris tool that you read about in the previous section. It will automatically open the Cometary Activity tab of your Unistellar App and enter the coordinates of the target and its recording parameters. If the Right ascension box and Declination box are filled with the correct coordinates, click on Goto to point to your target. Once Goto is done, if the Record duration, Exposure time, and Gain are correct, you can click on Save.
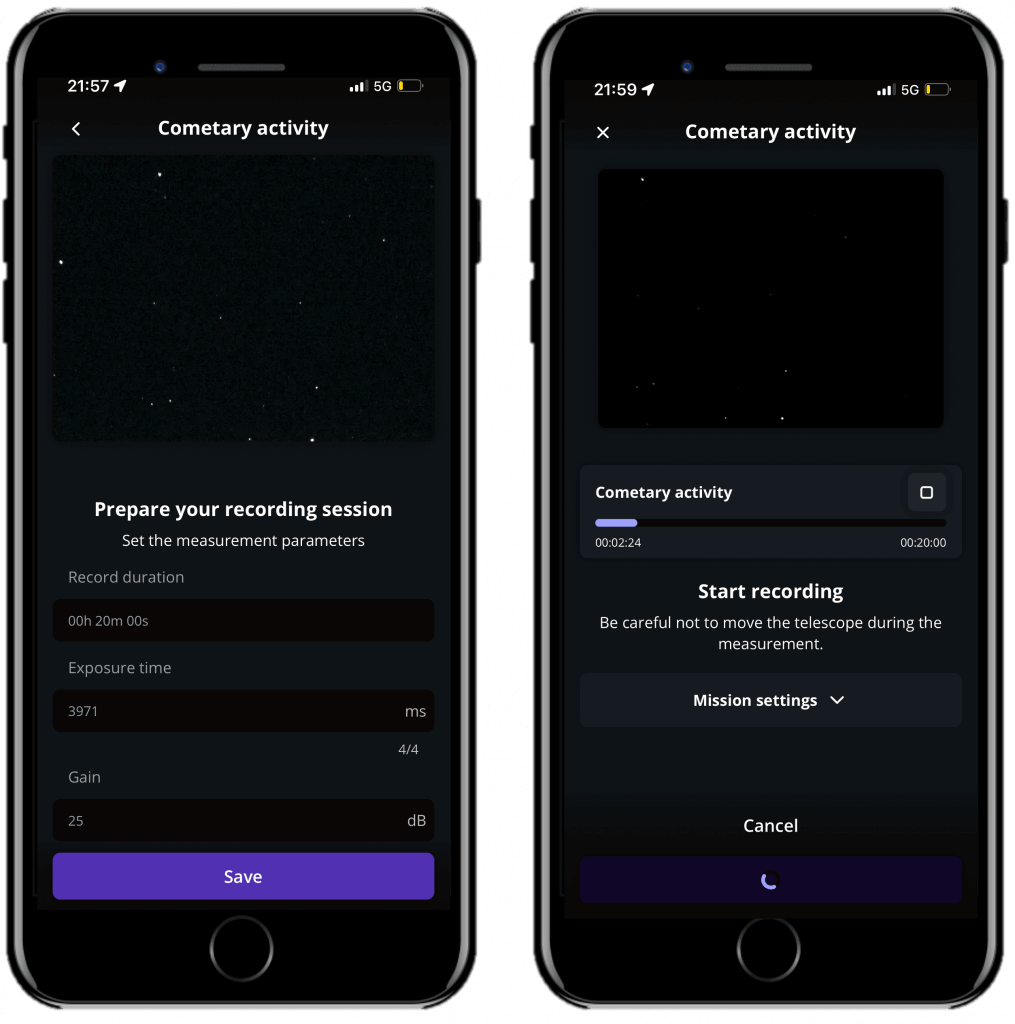
5 – Launch Observation
You have the choice to first observe the comet and its coma with the enhanced vision mode or to directly collect scientific data. To collect scientific data, repeat the previous step. When you are ready, click on the Record button to start the observation.
During the observation, you may see the comet moving.
6 – Complete Observation
Once the recording is over, click on Continue to calibrate your sensor. This calibration step gathers Dark Frames, which will help us better analyze your observation. You must put the dust cap on your telescope before recording the calibration.
After this step, a final message appears: “Recording complete”. The mission is over.
POST-OBSERVATION
5 – Share your data
Once you are at home, please upload your data to our server. Our team of scientists will analyze your observation to check if you detected the occultation. If you need help, please read these guidelines on “how to upload my data”.
6 – Tell Unistellar you participated
To make sure your contribution is properly processed and you are credited for the result, always fill out this Comets Observation Report. It asks for your name, the serial number of your telescope, and the name of the scientific mission you just accomplished.
We will send you the result of your scientific mission through our Slack communication platform within 24 hours.
Great Work, Citizen Astronomer.
